


Sword x Staff Gear Refinement & Affix Guide – Don’t Waste Your Stones
Season 2 completely changed gear progression in Sword x Staff. With Refinement and Affix Transfer, players can now reroll and preserve strong affixes—but the real question is how much you should invest.
Top‑up on WISHGM and enjoy great savings

 Up to 32% off on top‑ups
 Fast delivery within 3 mins
 Highly‑rated & trusted
 Secure transactions
This guide explains how Affix Transfer and Refinement work, which affixes to prioritize, when to stop rerolling, and how to avoid wasting resources.
WISHGM Sword x Staff top-ups has your pulls covered — Pay Less, Play More!
How Affix Transfer Works
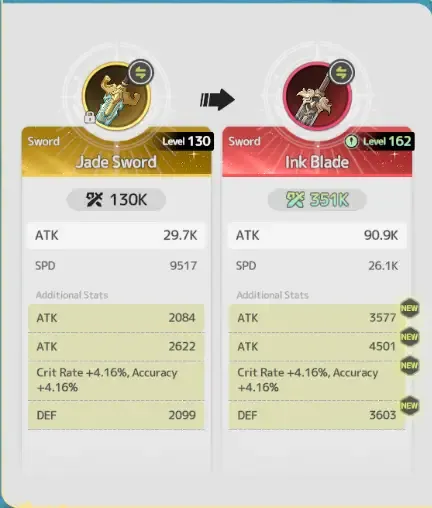
Starting in Season 2, players can transfer or reroll affixes between Mythic or better gear. The left-side item is destroyed immediately after the transfer.
The Golden Rule: The inherited item must be the same gear type as the parent item. A sword can only inherit from another sword, while a tome can only transfer to another tome.
Within the same season, Affix Transfer costs zero Divinecraft Stones, so you can transfer affixes as often as needed. However, affix values scale with the destination gear's level. For example, an ATK affix can increase from 2,084 to 3,577 on higher-level gear.
You can transfer affixes directly from the gear interface or by visiting Micaela, the blacksmith in Cinder Ridge.
Gear Refinement—Rerolling Your Lines
In Sword x Staff, you can keep a good gear piece and reroll its affixes instead of replacing it.
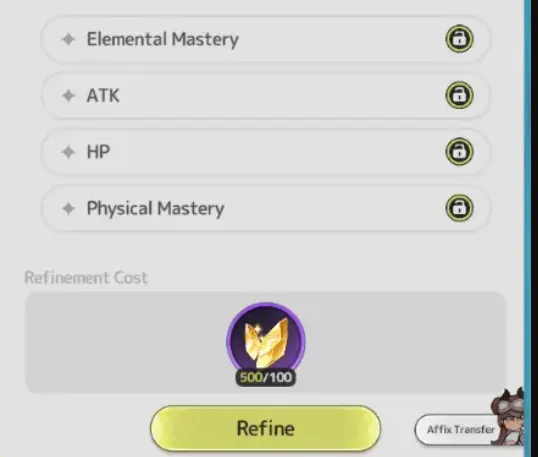
Only Mythic or better gear can be refined. Open the gear interface, click Enhance, then select the Refine tab. The system shows four affix lines, and Affix Preview lets you check the available affixes and their value ranges.
The Cost of Rerolling
Locking and unlocking affix lines is free. The cost is applied when you reroll.Here's the cost breakdown:
| Lines Locked | Cost per Reroll |
| 0 | 100 Stones |
| 1 | 300 Stones |
| 2 | 1,200 Stones |
| 3 | 3,200 Stones |
Finding one strong affix is relatively affordable. The cost rises quickly when you try to force a second, third, or fourth premium line.
Unique Affixes—One Rule You Cannot Break
Some affixes have the Unique tag, and each gear piece can only have one Unique affix. More importantly, equipping multiple copies of the same Unique effect does not increase its effect—only one copy applies.
For example, Wind Shield, which grants a shield based on max HP at the start of combat, can only appear on Helm, Armor, and Boots. If two equipped pieces have Wind Shield, only one shield will activate.
Important: Gear effects may share names with Techniques, but they are not Techniques and won't trigger Technique-related effects. However, they can stack with Techniques and Charms. For example, a Wind Shield Charm and Wind Shield gear effect can both provide their shields.
Divinecraft Stones—Where They Come From
Divinecraft Stones come from dismantling Mythic or better Gear/Shards:
-Mythic Shards: 50 shards = 100 stones (2 stones per shard)
-Divine Shards: 6 shards = 18 stones (3 stones per shard)
Before dismantling valuable shards, check your server's trading house. Selling or saving them may provide better value than converting them into stones.
Cross-Season Transfer—The Real Cost
Cross-season transfer is where Affix Transfer becomes expensive. If you want to carry a strong Season 2 Staff into Season 3, you'll need to spend Divinecraft Stones.
Cross-season transfer is selective and costly:
| Affixes Carried | Cost |
| 1 | 300 Stones |
| 2 | 1,200 Stones |
| 3 | 3,200 Stones |
| 4 | 8,000 Stones |
Any affix you don't select is randomly rerolled on the destination gear. While ordinary affixes can be transferred, they usually aren't worth the cost.
My recommendation: Focus on carrying one or two premium affixes into the next season. Consider three or four only when the affixes are exceptional, the gear has long-term value, and the cost won't slow down your overall progression.
Before You Lock—Three Questions
Before locking any line, ask yourself three questions:
How Strong Is the Roll?
The same affix can roll at different values. Two Crit Rate + Accuracy lines can have completely different numbers. Always compare the roll with the range shown in Affix Preview.
Does It Fit Your Class and Build?
-Speed to Attack is a natural fit for many Duelists.
-Defense to Attack works better when a Knight already has high Defense.
-A rare affix isn't automatically useful if your build can't benefit from it.
Will the Condition Actually Be Active?
-PvE and PvP bonuses only work in their respective modes.
-Damage against debuffed enemies requires reliable debuff uptime.
-Airborne, Frozen, or Stun bonuses lose value against bosses that resist crowd control.
Rarity also matters. On one weapon slot I recorded, an ordinary line had a 4.75% rate, while a compound line had only 0.343%—making the compound roll about 14 times rarer. Protect valuable compound affixes before spending resources on replaceable stats.
Class Affix Priorities
The four classes in Sword x Staff—Duelist, Knight, Sorcerer, and Sage—have different affix priorities. Use the following rankings as a starting point.
Duelist (Melee DPS)

Duelist relies heavily on Crit Rate, with Crit Damage and Accuracy following closely behind.
S-Tier:
-Double Crit (Crit Rate + Crit Damage)
-Speed to Attack (when your Speed supports it)
-Technique Damage to Debuffed Enemies
-Crit Rate + Accuracy (especially for PvP or block-heavy content)
-HP to Attack / Defense to Attack (when the conversion outperforms Speed to Attack for your build)
A-Tier:
-Strong single Crit rolls
-Accuracy
-Dodge
-Dedicated PvE/PvP pairs (for specialized sets)
-Double Block (for defensive Duelists)
B-Tier:
-General defensive combos (Quick Resistance + Block, Damage Resistance + Healing Boost)
-Blazing Burst, Shock Blast, Surging Blast (build-dependent)
Duelist Rule: Build your Crit, Crit Damage, Accuracy, and preferred Attack conversion first. Only invest heavily in special effects once these core stats are covered.
Sorcerer (Ranged AoE Nuker)

Sorcerer focuses on ranged AoE damage and benefits most from consistent offensive stats.
S-Tier:
-Double Crit (reliable foundation)
-Speed to Attack / HP to Attack (when those stats are developed)
-Technique Damage to Debuffed Enemies
-Defense to Attack (only with sufficient Defense)
-Crit Rate + Accuracy (especially in PvP)
A-Tier:
-Dodge Chain (when the build consistently triggers it)
-Dedicated monster/player pairs (for specialized gear sets)
B-Tier:
-Single Crit / single Crit Damage
-Blazing Burst / Surging Burst
-Dodge
Sorcerer Rule: Build a reliable damage engine first. Add trigger-based effects only when your skills can activate them consistently.
Knight (Tank/Defender)

Knight focuses on survivability, with Block and Rebound playing a major role in difficult content.
S-Tier (Tank Knight):
-Double Block (premium line)
-Crit Resistance + Block
-Crit Rate + Accuracy (for offensive Knights)
-Shield Damage Reduction (when available on the relevant slot)
A-Tier:
-Additional Block
-Damage Resistance + Healing Boost
-Attack conversion matching your build (Defense to Attack is the natural starting point)
-Double Crit and dedicated PvE/PvP pairs (for damage-focused Knights)
Knight Rule: Decide whether the gear belongs to your tank or damage set before locking anything. Trying to make every piece serve both roles can weaken both builds.
Sage (Support / Hybrid Caster)

Sage can focus on either damage or support, so its priorities depend heavily on the build.
Damage Sage (S-Tier):
-Crit Rate + Accuracy
-Technique Damage to Debuffed Enemies
-HP to Attack / Defense to Attack
-Double Crit (especially after reaching sufficient Accuracy)
Support Sage (S/A-Tier):
-Damage Resistance + Healing Boost
-Double Block
-Quick Resistance + Block
-Strong Healing Boost rolls
Situational:
-Block, single Crit Rate, and single Accuracy can fall into A or B-Tier depending on whether the gear is for damage, support, or PvP.
-Summon Damage / Summon Defense are build-dependent. They are useful for dedicated summon builds but shouldn't replace core stats simply because Sage can use summons.
Sage Rule: Decide whether the gear is for damage or support first, then evaluate the affixes. A strong support line may have little value on a damage build, and vice versa.
Transfer Strategy
Same-Season Transfer (Free)
-Both pieces must be Mythic or higher and of the same equipment type. The material gear is placed on the left and will be consumed, while the base gear on the right remains.
-Cost: 0 Divinecraft Stones
-All affixes are transferred to the base gear
-Percentage affixes keep their values, while flat stats scale with the base gear's level
-Locked gear cannot be used for transfer. Use this to avoid accidentally consuming valuable gear. When transferring, unlock only the intended material and base gear, make sure the material is on the left, then lock the surviving piece again afterward.
Cross-Season Transfer (Expensive)
-Save cross-season transfers for rare, high-roll affixes that are difficult to replace. For most players, transferring one or two premium affixes offers the best value.
-Identify potential transfer pieces before the season ends. Don't wait until the last minute to decide what to keep.

Final Though
The goal of gear refinement isn't to get four gold-looking affixes on every item. The goal is to build gear with affixes that:
-Fit your class and build
-Work in the content you actually play
-Remain valuable enough to keep when your gear changes
Start with one strong affix, improve your weakest pieces over time, and save cross-season transfers for lines that are genuinely difficult to replace.